Monday, April 30, 2012

Summer is here!!!! :D

Hello readers!!


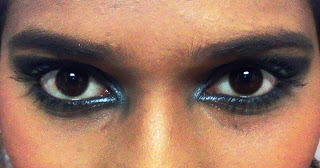
Summer comes with colors...and what fun it is to get out and look brighter than the sun?!! Look funky, floral and fun with make-up!! Here are a few looks you can try for brunch and day-outs!! Tchin-tchin! ;) 


The following are just a play with orange. Orange goes extremely gorgeous with Indian skin tone. 

I have just applied plain orange shade on my eyes and highlighted it with eye pencil.


I added brown at the end and at the upper crease with slight golden shimmer at the tip and below the eyebrow. And a slight gold shimmer below the kaajal highlights your Kaajal even more.


This is a bit of a twist I tried. Added a hint of green at the crease. Also used a Green pencil as Kaajal under the eye. A little of gold at the tip completes the look!


More ''Summer looks'' coming soon!! ;)


P.S. Beauty is within YOU!! :)

Monday, April 16, 2012

Blush Blush...!!

Hello readers!!


A blush is the perfect way to enhance the features of your face. If you apply it the appropriate way and in right amount it will perfectly highlight your eyes and good bone structure. The colour of the blusher is chosen according to the skin complexion. It can be matched to the dress too.


Colors 
For fair skin: 
Coral/ Pink/ Orange


For wheatish skin:
Pink/ Light brown


For dark skin:
Red


How to apply
It is very important to apply blush the right way. Apply lots of blusher only when you are intended to do heavy make-up. Keep the color only till visible. Extra application will make your make-up look shabby.


- Blush should be applied only on cheek bones for normal wear.
- Start from the cheekbone below your eyes and extend the color upward with a brush till the end.  Make circular strokes in an upward direction to evenly spread the blusher. 
-If you are unable to identify your cheekbone, don't worry. Just smile harder. Your raised cheeks show you the point of application.
- Do not spread the color anywhere else. 


Tip:
You can give an effect of raised cheekbones by using a bronzer or a dark tone of blusher below your cheekbones. Merge the two colors with a brush with the same method. It also gives a shadow effect.


P.S. Beauty is within YOU!! :)

Tuesday, April 3, 2012

Just two colors!

Hello readers!


Get this look!!
With the help of gold and purple you can get a bling look too!! Instead of purple, you can use any other color of your choice. 


Apply the two colors and merge them in the middle. Do the same below your lower eyelid. 


Now apply mascara to highlight your eyes. Finish the look with tint of bulsh and a natural lipcolor.


Et voila!! 


P.S. Beauty is within YOU!! :)

Something simple...

Hello readers!


This is a simple make-up which can go on almost any attire.


I have used:


Eye shadow colors- white, purple, dark brown/dark purple.
Mascara
Eye shadow brush
Foundation
Blush
Lip balm
Lip gloss/ Lipstick
Face powder


Step 1


Apply concealer if needed on dark circles and dark spots. Cover your face, neck and ears evenly with the right shade of foundation. Use a slight tint of blush on cheeks in an upward direction. Use face powder to seal your base.


Step 2
 For your eyes:


1. Apply white eyeshadow with a brush on your eyelids. Also, with the help of the eye shadow brush apply below your lower eyelid. 


2. Use purple eye shadow from the middle of the eyelid till the end. Merge thje two color in between.


3. Take the dark shade of brown or purple and apply at the end of the eyelid. Start from the edge and merge with the purple. Do not spread the color below your eyebrows.


Step 3


Use a mascara on both the lashes. You can apply liner if you have small eyes. Conclude with a natural tint of lipcolor or lip gloss.


Keep the make-up as light as possible. Do not overdo it. 


P.S. Beauty is within YOU! :) 

Sunday, March 18, 2012

PINK!!!! :P

Hello readers!!!


I HATE PINK!!! But i cant hate any colors when it comes to make-up and beauty. Ironically, my blog page is in pink. :P  Also, my mom suggested that I should use pink to make it not look too bright for people like me. :P So, this is what came to my mind-


You need:


1. Eye shadows- light pink, bright pink, brown, gold.
2. Pink eye pencil.
3. Mascara.
4. Make up sponge.
5. Loose face powder.
6. Eyebrow pencil and brush.
7. Eye shadow brush.


Step 1


Apply light pink eye shadow on the eyelids. 


Step 2


Add gold eye shadow below your eyebrows. 


Step 3


Apply bright pink eye shadow from the middle of the eye lid to the end merging it in the middle with the light pink shade. 


Step 4


Add brown at the end of the eyes and above the crease. Smudge the edges of the brown from outside with a little amount of loose powder on make up sponge. Blend the brown with pink. Apply gold eye shadow at the tip of your eyes extending it a little above and below the tip.


Step 5


With pink eye pencil underline your lower lash.  Start from where the lash begins. Apply lots of mascara. Define your eyebrows with eyebrow pencil and brush it off to make the color even. Do not use eyebrow pencil if you have dark well defined eyebrows. And the look is ready!! :)


I hope you like the look. DO let me know what you feel!! :D


P.S. Beauty is within YOU!! :)

Black, brown and Gold!!!

Hello readers!!


Get ready for any occasion with this eye-make up look! This look will suit any dress and any event. Take a look-


You need:


1. Eyeshadow colors- black, dark brown, light brown, gold.
2. Eye shadow brush.
3. Mascara.
4. Kaajal.
5. Smudger.
6. Eyebrow pencil.
7. Eyebrow brush.
8. Make up sponge.
9. Loose face powder.


Step 1


Apply light brown eyeshadow with a brush on your eyelids.


Step 2


Apply dark brown from the middle of the eyelid till the end. Merge the two colors where the dark brown shade begins.


Step 3


Apply black eyeshadow at the end of the eyelid. Also apply on the border of the crease above, starting from the middle to the end. 
Spread the black shade upto the end till the meeting point of eyeshadow and eyebrow. Blend the black with the brown inside. 
Use a sponge with little loose powder to smudge the edges of the black shade from the outside.


Step 4


Apply gold eyeshadow at the inner tip of the eyelid. extend it a little above and below the tip. Merge it with brown.


Step 5


Apply kaajal inside the lower eyelid. 
Apply black eyeshadow below and from the start of the lower eye lashes. Extend it till the end of the eyelid. Smudge it outwards with a smudger. 
Apply thick mascara on both the lashes. 
Apply eyebrow prencil and brush it evenly on your eyebrows. This is required only if you have sparse eyebrows. And you are ready to flaunt your eyes!!


Do let me know what you think about this look... Also queries, suggestions, comments and complaints accepted! 


P.S. Beauty is within YOU! :)

Saturday, March 10, 2012

The smoky eye look! ;)

Hello Readers!!!


This time I am going to show you how to get the basic smoky eye look!! Its easy and quick. 


All you need is:


Black eye shadow.
                                   I have used here VOV glitter black eye shadow.


Contour eye shadow brush.
This eye shadow brush is perfect to line borders and small complicated designs. Its edge is slightly diagonal.


Mascara.
Kaajal.
Smudger.
                                    Its the avon Kaajal with smudger at the other end.


Use the following steps to get the look!!


Step 1
Firstly, apply foundation evenly on face. On the base of foundation use blush on your cheeks- pink, orange, brown or maroon as you wish! The strokes should be upwards towards the cheekbones.


Step 2
Use a contour brush with eye shadow to mark the border of your look. 
Your border should be on your crease line as shown in the picture above. Do not extend your eye shadow beyond your eyebrow and eyelash meeting point. 
Tip: Before applying eye shadow lather your under eye with loose face powder. After using the eye shadow brush off the powder as the eye shadow falls on your face while applying and may ruin the make-up. 


Step 3
Fill up the inside and make it dark or light according to your choice. Specifically use darker black if its a night occasion and vice verse. 


Step 4
Now apply kaajal inside the lower eyelid. 
Use the contour brush and apply eye shadow underneath the lower lashes upto the end. 
Join the eye shadow at the inner side but don't bring it too ahead. 
Now use the smudger and give outward diagonal strokes at the end of the lower lashes starting from the inside to outside. 
Smudge the same way at the edge of the eye shadow from underneath.


Step 5
Apply mascara on the upper as well as lower lashes. And Voila!! Your eyes are set to capture everyone's attention. ;)


Step 6
Use vamp red/plum for lips or just go bare nude. You are ready to rock the world!! ;) :* 


P.S. Beauty is within YOU! :)


Saturday, March 3, 2012

Enhance your EYES!! ;)

Hello Readers!!!


Eyes are the most expressive part of our face. They say everything about you. so why not give them the exact look?? ;) In this article I shall give you basic tips on how to enhance your eyes only with the help of an eye-liner.


But first here is a trick on how to apply a liner for those who are not good at it:


1. Always use liquid eye-liners for practice. They are the best. Helps you to keep control on your hand and also you can give many effects with the same.


2. Start with a thin line of liner from the middle on top of your upper lashes to the end of the lashes.


3. Now start a very thin line from the inner corner of the lashes and join it to the middle. 


4. You can fill in the spots where the line is uneven.


Tip: You can practice on your colleagues, but the effective way will be practicing on yourself. 


You can get fabulous looks in in the following steps in every type!! 


Step 1/ Type 1


 This is the first step and the simplest one. Drag the liner only till the end of your lashes. Its an everyday look and quite formal too.


Step 2/Type 2
 Drag the liner just a little ahead of your lashes. But stop at the meeting point of your crease as shown in the pic above. Also, remember that when you extend the liner, the the line should match the line of your lower lid. You can apply kaajal on the lower lid to enhance your eyes even more. but if you have wide eyes I would suggest you should apply thin liner and kaajal and vice-verse.

Step 3/Type 3


 Now, extend the line all the way to the meeting point of your lower lid and your eyebrow. Do not go beyond that. You can thicken the liner if you wish as shown above but don't thicken it from the inner corner. 

Step 4/Type 4


You can drag the liner inside on the lower lid till the middle. 
Step 5/Type 5


  Now extend the liner up to the inner end of the lower lid. Make the liner thick at the outer edge but thin inside. 

Your 5 looks are ready!! ;)

You can enhance these looks by using volume mascara on the lashes and kajal on the inside of the lower lid. 
I used blue eye-liner for visibility but you can use any of available colors like black, green, plum or blue.


Do try these steps and let me know what you think about it!! :)
Many more easy looks to try on coming soon next weekend...


P.S. Beauty is within YOU :)

Saturday, February 25, 2012

Tips to cover up flaws on your face!

Hello readers!!

I'm super excited to share with you ''My Pretty Little Secrets" about 'hair' and 'make up'! It's easy, reasonable and quick for every occasion. We shall start with make-up. The basic step is the base of any make-up - covering up those nasty flaws! 

All you need -

1. Foundation of your skin tone- any type, any brand.
2. Concealer / Foundation of a light skin tone.
3. Loose face powder.
4. Moisturizer.
5. Skin toner.

You must be thinking why I prefer foundation of a light skin tone instead of concealer. The fact is, concealers have a lot of oil base which does not suit sensitive and oily skin.  Hence, foundation which can work as a perfect alternative. I would suggest pan cake foundations for dry skin, and liquid foundation for sensitive to oily skin. Follow the steps to get that flawless look! ;)

Step 1
Wipe your face with skin toner on cotton. Skin toner is essential to shrink the appearance of pores on your face which block dirt or anything from entering your skin. Let it dry. Apply mild face moisturizer evenly.


                                   My face without any make-up. Do not laugh.

Step 2 
The main part. If you are using a concealer make sure its the right tone. It can be of your skin tone or a shade lighter. Apply the light tone foundation/concealer on the dark spots, pimples or dark circles. Always remember to dab on the area and not spread it. This helps for the concealer to stay on the area for long. Wait for it to dry.


After applying concealer/light tone foundation. Observe that it gives a very oily effect.

Step 3
Dab loose powder on these flawed areas and remove the excess powder with a rouge brush. This seal your concealer.


                           After applying loose powder. It also banishes the oily effect.

Step 4
Apply foundation evenly and gently on the face covering all the areas- the flaws, neck, face and ears. And Voila!!! You have a beautiful flawless skin! ;)  You can do the rest of the make-up thereafter. You can apply powder if you wish but i suggest not to if you are in a humid weather. But its a must if you are in a warm place. The sweat will ruin that look soon. 


                 There you go!! ;) Now you are ready to pour in colors to your canvas :P

Remember
Keep a tissue in hand to wipe sweat or dust off your face but dab it and NOT wipe. 

You guys need not worry about which brand of concealer to use. You can choose any brand according to your budget and favours. 
Any queries, suggestions and comments are gladly accepted!! Do reply!! ;)

P.S. Beauty is within YOU! :)